

Yoga for Students
Yoga can be a great way for students to reduce stress, increase focus and concentration, improve posture, and boost overall physical and mental well-being.
Here are some yoga asanas (poses) that can be particularly beneficial for students:
- Tadasana (Mountain Pose) -

Here are the steps to perform Tadasana:
1. Begin by standing at the front of your mat with your feet hip-distance apart and your arms by your sides.
2. Press your feet firmly into the ground, distribute your weight evenly between both feet, and lift your toes to activate your arches.
3. Engage your leg muscles and lengthen your tailbone towards the floor, as if you are trying to touch the ground with your tailbone.
4. Draw your shoulder blades down and back, and extend your arms alongside your body with your palms facing forward.
5. Lift the crown of your head towards the ceiling, lengthening your spine, and keep your chin parallel to the ground.
6. Breathe deeply and hold the pose for 30 seconds to 1 minute, or longer if you feel comfortable.
To come out of the pose, release your arms and lower your hands to your sides, then step your feet together.
- Vrikshasana (Tree Pose)-

Vrikshasana or Tree Pose is a standing yoga posture that helps to improve balance and concentration while also strengthening the legs and core.
Here are the steps to perform Vrikshasana:
1. Stand straight on your yoga mat with your feet together and arms at your sides
2. Shift your weight onto your left foot and raise your right foot off the ground.
3. Bring the sole of your right foot to the inside of your left thigh, pressing your foot into the thigh and the thigh into the foot.
4. Keep your left leg straight and firm, grounding through the foot and engaging the muscles of the leg.
5. Bring your hands together in front of your heart in prayer position or raise them above your head, keeping your palms facing each other.
6. Fix your gaze on a point in front of you to help with balance.
7. Hold the pose for 30 seconds to a minute, breathing deeply and steadily.
8. To release the pose, lower your arms and leg and return to standing.
9. Repeat the pose on the other side, shifting your weight onto your right foot and bringing your left foot to the inside of your right thigh.
Remember to keep your breath flowing smoothly and avoid locking your knee or ankle joints. Gradually increase the duration of holding the pose as you become more comfortable with it.
- Adho Mukha Svanasana (Downward-Facing Dog Pose)-

Here are the steps to practice this pose:
1. Begin on your hands and knees with your wrists directly under your shoulders and your knees directly under your hips. Your fingers should be spread wide apart, with the middle fingers pointing straight ahead.
2. As you exhale, lift your knees off the ground and straighten your legs. Keep your hands pressed firmly into the ground and your arms straight.
3. Lift your sitting bones toward the ceiling, lengthening your spine. Imagine a rope pulling your hips up and back.
4. Press your heels toward the ground. If your heels don't reach the ground, don't worry. Just keep your legs straight and your spine long.
5. Keep your head and neck relaxed, with your gaze toward your thighs or belly button.
6. Breathe deeply and hold the pose for 5 to 10 breaths.
7. To release, exhale and lower your knees to the ground, coming back to the starting position.
Tips:
1. If you're new to this pose, you may want to practice it with your knees slightly bent and your heels lifted off the ground.
2. If you have tight hamstrings or a tight lower back, it's okay to keep your knees bent in this pose.
3. You can also use props, such as a block or a blanket, under your hands if you have difficulty reaching the ground.
- Bhujangasana (Cobra Pose)-
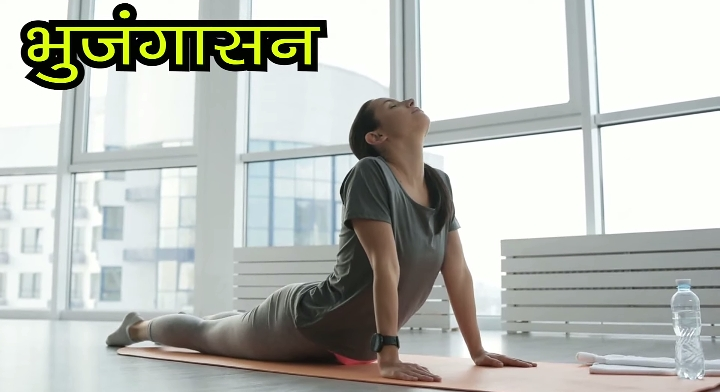
Bhujangasana or Cobra Pose is a popular yoga pose that is great for strengthening the back muscles and improving flexibility.
Here are the steps to perform Bhujangasana:
1. Lie on your stomach with your legs extended straight behind you and your feet hip-width apart. Place your palms on the mat, below your shoulders, with your fingers spread wide.
2. Press your palms into the mat and slowly lift your head, chest, and torso off the mat, using your back muscles. Keep your elbows close to your body and your shoulders relaxed away from your ears.
3. As you lift your chest off the mat, start to straighten your arms, but keep a slight bend in your elbows. Keep your gaze forward, and don't strain your neck.
4. Hold the pose for a few breaths, taking slow, deep breaths in and out through your nose.
5. To release the pose, slowly lower your chest and torso back down to the mat, and rest your forehead on the mat.
6. Repeat the pose for 3-4 more times, taking slow, deep breaths and lifting only as far as feels comfortable.
Tips:
Avoid pushing yourself too far in the pose as it can cause strain or injury. Keep your shoulders relaxed and away from your ears to avoid tension in the neck and shoulders. Engage your core muscles to protect your lower back. Take slow, deep breaths and focus on your breath to help you stay calm and centered in the pose.
- Paschimottanasana (Seated Forward Bend) -

Paschimottanasana, or Seated Forward Bend, is a yoga pose that stretches the entire back of the body, particularly the hamstrings and spine.
Here are the steps to perform the pose:
1. Start by sitting on the floor with your legs extended in front of you and your spine erect. Place your palms on your thighs.
2. Inhale deeply and raise your arms up towards the ceiling, lengthening your spine.
3. Exhale and slowly bend forward from the hips, keeping your spine straight. Try to reach your toes or wrap your hands around the soles of your feet.
4. As you fold forward, keep your chest and belly close to your thighs. Avoid rounding your spine or collapsing your chest.
5. Hold the pose for 30-60 seconds, breathing deeply and relaxing into the stretch.
6. To release the pose, inhale and slowly rise back up to a seated position with a straight spine.
Tips:
If you have tight hamstrings, you can bend your knees slightly to ease the stretch. Use a strap or a towel to wrap around your feet if you can't reach them comfortably. Avoid jerky movements and take your time to fold forward slowly and gradually. If you have any lower back or hamstring injuries, consult with your doctor or a qualified yoga instructor before attempting this pose.
- Padmasana (Lotus Pose)-

Padmasana, also known as the Lotus Pose, is a classic yoga posture that can be challenging for beginners.
Here are the steps to do Padmasana:
1. Start by sitting on the floor with your legs stretched out in front of you.
2. Bend your right knee and bring your right foot to the top of your left thigh, tucking your heel into your groin. Ensure that your right knee is on the floor and your right foot is facing upwards towards your body.
3. Do the same with your left leg, bending your left knee and placing your left foot on top of your right thigh. Keep your left foot tucked into your right groin, and make sure that your left knee is on the floor.
4. Place your hands on your knees or thighs, with your palms facing upwards.
5. Straighten your back and sit up tall, lifting your chest and relaxing your shoulders.
6. Gently close your eyes and focus on your breath, remaining in the pose for a few minutes.
Note that Padmasana requires a significant amount of flexibility in the hips, knees, and ankles, so it may take some time and practice to achieve the full pose. If you experience discomfort or pain, modify the posture or seek guidance from a certified yoga teacher.
- Savasana (Corpse Pose)-

Savasana, also known as Corpse Pose, is a deeply relaxing yoga pose that is usually practiced at the end of a yoga session.
Here are the steps to do Savasana:
1. Lie down on your back on a comfortable surface, such as a yoga mat or a folded blanket. Make sure that your feet are slightly apart and your arms are by your sides, with your palms facing upwards.
2. Close your eyes and take a few deep breaths. Inhale through your nose, filling your lungs with air, and exhale through your mouth, letting go of any tension or stress.
3. Scan your body from head to toe, relaxing each part as you go. Start with your forehead and face, then move down to your neck, shoulders, arms, hands, chest, abdomen, hips, legs, and feet. Release any tension or tightness in each area as you breathe out.
4. Once you have relaxed your whole body, focus on your breath. Observe the natural rhythm of your breath without trying to change it. If your mind wanders, gently bring it back to your breath.
5. Stay in Savasana for at least 5-10 minutes, or longer if you have the time. When you're ready to come out of the pose, deepen your breath and wiggle your fingers and toes. Roll onto your side and rest for a few more breaths before slowly sitting up.
Savasana is a wonderful way to reduce stress, calm the mind, and rejuvenate the body. Make it a regular part of your yoga practice for maximum benefits.


0 टिप्पणियाँ